

How To Fix Sound Lag On Computer
Is your Windows 10 PC stuttering every few seconds with audio and video issues? Yous're not alone. Several users have reported that their PCs lag every few seconds when performing day-to-24-hour interval tasks or playing games. The problem is that the mistake occurs unexpectedly, and when it happens, the mouse tin can freeze or your keyboard may stop being responsive.
If you are playing a game when the error occurs, the delayed or laggy images tin drastically affect your gameplay and defeat the whole purpose of enjoying PC games.
Why Does Windows ten Lag Every Few Seconds?
Many factors could crusade your figurer to freeze randomly every few seconds, each unique to the Windows OS. Information technology doesn't matter if you're using an SSD (solid-state drive) or HDD (difficult disk bulldoze), and it doesn't depend on how fast your processor is. The stuttering effect tin affect any system and can be quite irritating.
So, why does a Windows 10 PC stutter randomly? The most common reasons are every bit follows:
- Outdated drivers. Unremarkably, outdated drivers are to blame for a sluggish computer. Your device drivers could besides be faulty or corrupted, thereby triggering the stuttering issue.
- Windows updates. Windows updates do not ever fix bugs and system glitches. Sometimes, updates create PC issues, causing the system to freeze every few seconds.
- Faulty hardware could also be responsible for this problem. Ane of your difficult drives or retentiveness sticks could be having problems that are causing the arrangement to freeze.
- Background applications. If many apps are running in the groundwork simultaneously, your system may be unable to handle all those processes, which affects the PC'southward functioning.
- Malicious programs or files. You may have downloaded a malicious app or file unknowingly, which might be causing random freezes or crashes.
- Incompatible program. You lot may feel stuttering issues, specially in demandingapplications, considering your organization specifications do not meet the requirements for the program you're running.
- Os upgrade. If you recently upgraded your PC to Windows 10 or 11, this could be the result every bit the operating organisation may not support some programs, drivers, or even hardware.
Regardless of the reason(due south) that triggered this abnormal PC beliefs, these solutions should help you resolve information technology.
How to Gear up Stuttering on Windows ten
In that location are different ways to gear up the problem on your reckoner, depending on the root cause. You can start from the first fix and check for the problem. Move on to the side by side solution if the outcome persists. Every troubleshooting footstep is detailed and you lot'll find the procedure for your operating system, whether you utilise Windows 10 or Windows 11.
You may not have to complete the article to get your answer to "Why does a windows xi pc stutter randomly?"
Solution ane: Check If Your System Meets the Minimum Requirements For Running Your Software
If you're running a particularly resources-intensive program, like Photoshop, or are playing a PC game, your machine has to meet certain requirements to support the program or game in question. Otherwise, the PC will freeze or lag since it can't handle all that pressure from the software you're trying to run.
Therefore, visit the plan publisher's website to check if your system meets all the requirements to support it. If your arrangement is well capable, then the issue lies elsewhere.
Most resource-intensive software programs depend on your graphics card. So, you take to confirm that your graphics carte du jour meets the program'southward requirements. What's more, you may think you're using the right Intel chipset, when in reality, yous're using one from the incorrect generation.
You tin cheque your GPU'southward details and chipset make and model in the Windows' DirectX Diagnostic Tool. Follow these steps on your Windows 10 or Windows 11 PC:
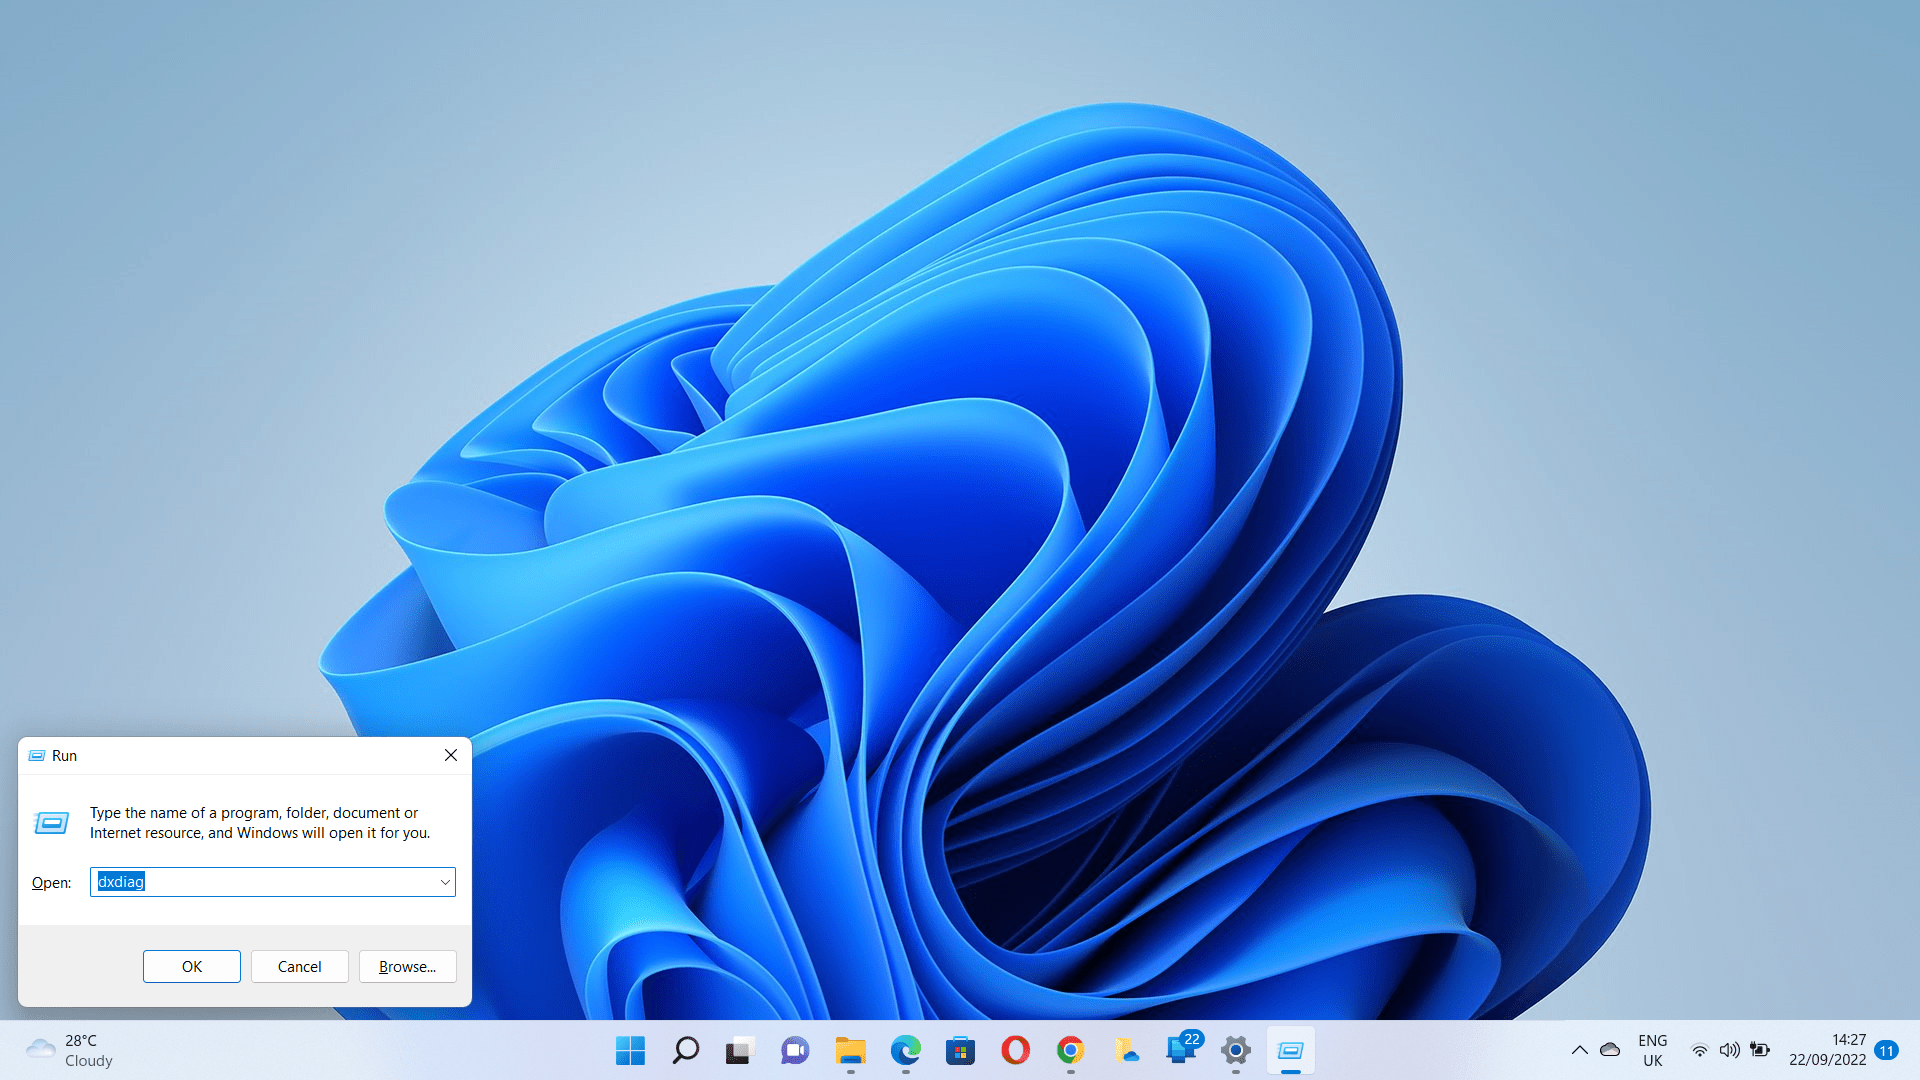
- On your keyboard, tap Win + R to launch the Run dialog box.
- After Run appears, go to the text box and type "dxdiag," and then hitting the Enter primal.
- Click on Yes if yous see a pop-upward dialog.
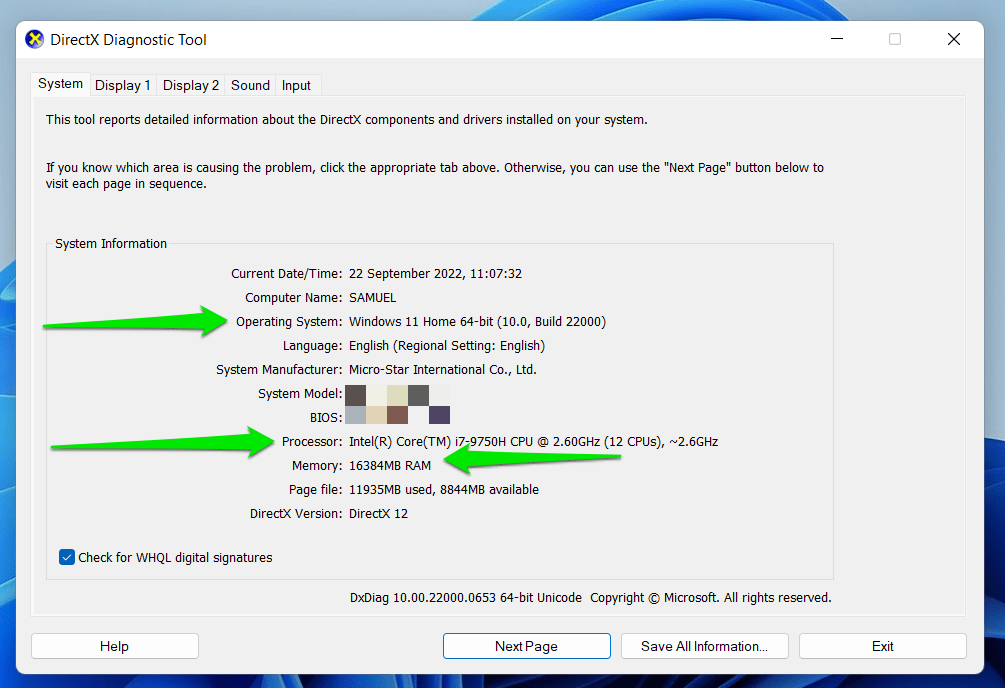
- One time the DirectX Diagnostic Tool window shows up, go to the Arrangement Information section under the Organization tab to cheque your PC's details. You'll detect your processor's information (including generation) next to Processor.
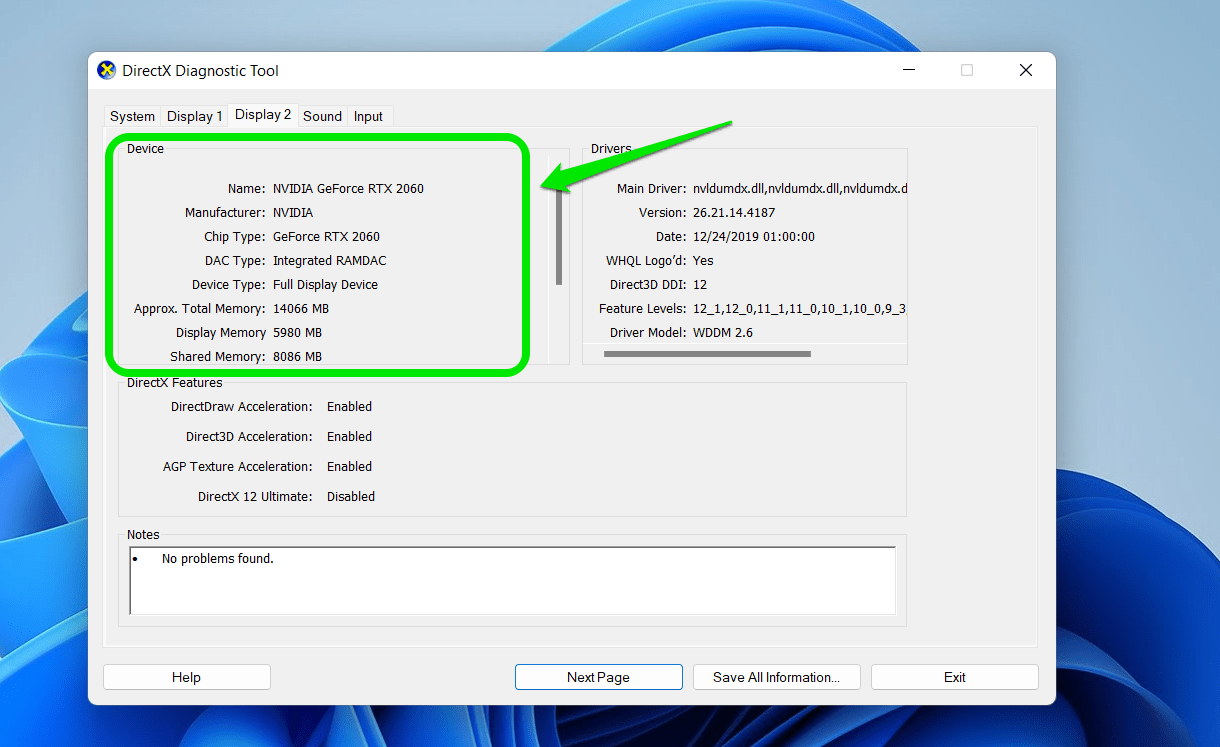
- If you employ a dedicated graphics card, yous'll run into two display tabs. Display ane is usually for your arrangement'south integrated flake while Display two shows details of your defended graphics bill of fare, whether information technology's an NVIDIA or AMD GPU.
Solution 2: Update Your Graphics Bill of fare Driver
Equally we said, outdated device drivers are one of the virtually common causes of slow performance and freezing on a Windows x machine. The display drivers are specifically to blame if your PC is stuttering every two seconds with sound and video issues or your game starts to lag.
The just way out is to install the latest graphics card drivers for your PC. You can do that manually or automatically.
Manually updating your device drivers entails checking the currently installed drivers to make up one's mind their model and version. Yous'll then need to visit the hardware manufacturer'south website and download the correct drivers uniform with your operating system. After installing the drivers, the stuttering issue should exist resolved.
Yous can besides opt to use the Device Manager to update the graphics menu commuter. Here is how to do that:
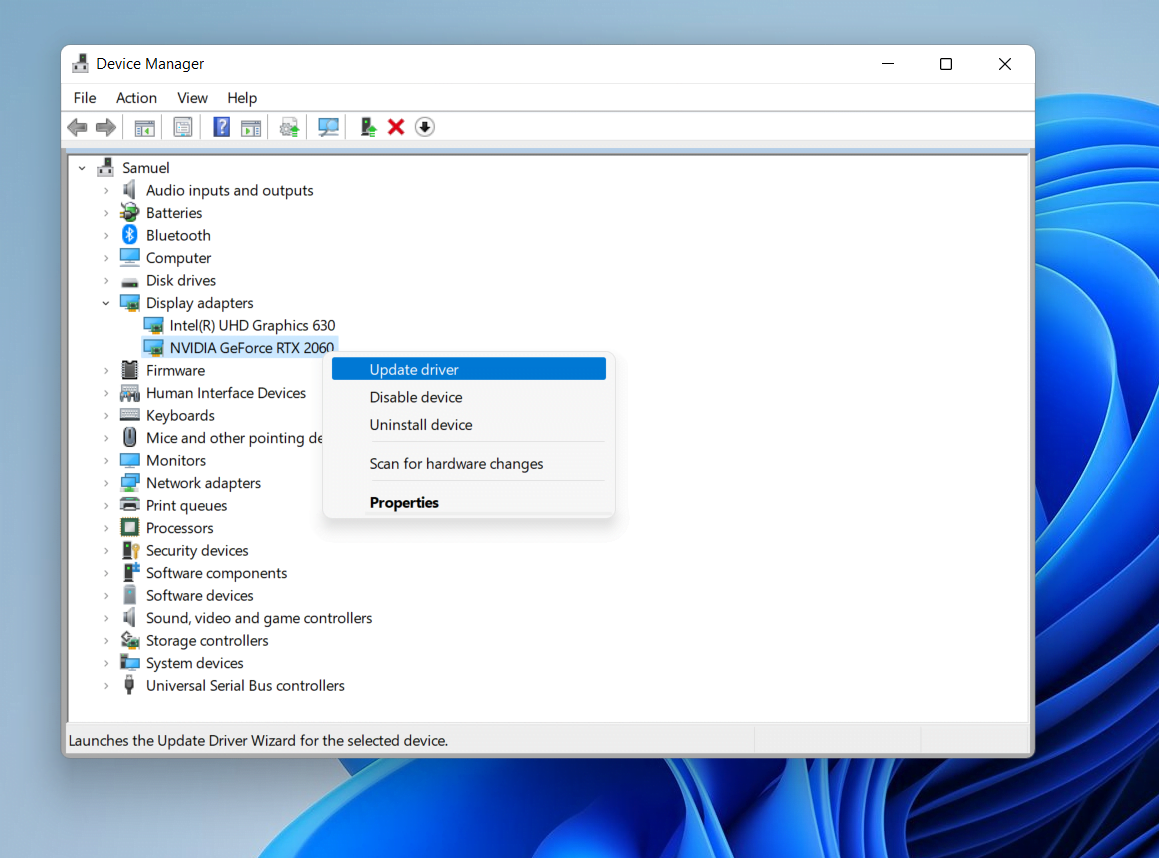
- Press the Windows logo central + 10, and select "Device Director" from the Quick Access menu.
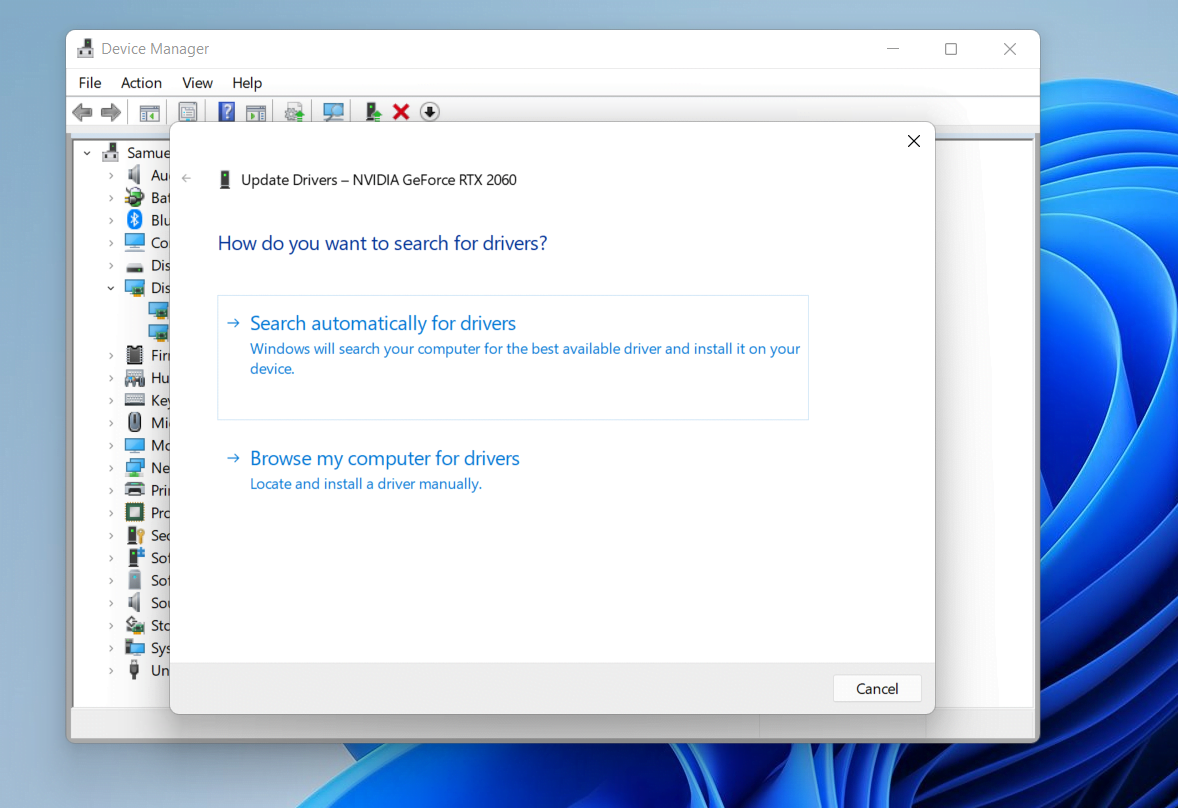
- Notice and expand "Display adapters", correct-click on your brandish adapter, and click on "Update driver".
- You'll be presented with two options. Select "Browse my calculator for drivers" and click on "Let me pick from the list of available drivers on my reckoner".
- Select "Microsoft Basic Brandish Adapter".
- Click on "Side by side" and follow the prompts.
- If this doesn't work, go dorsum to the "Display adapters" section, correct-click your device and select "Update driver".
- This time, select the start option to let Windows attempt to find the latest driver version online and automatically install it on your PC.
Typically, Windows will tell you that it has detected that the latest driver has already been installed.
The side by side method involves going through the Windows Update customer. You lot tin use the customer to download available updates.
Here's how to do this on Windows 10:
- Apply the Win + I shortcut to open the Settings application and click on Update & Security.
- After the WIndows Update folio appears, click on View all Optional Updates.
- In one case the Optional Updates interface shows upwardly, expand the Driver Updates section and select your graphics bill of fare driver.
- Click on the Download and Install button.
Follow these steps if you use Windows xi:
- Press the Win + I keyboard shortcut to bring up the "Settings" app.
- Click on Windows Update in the top-right corner of the Settings window or click on the Windows Update tab at the bottom of the left pane.
- Once the Windows Update page appears, go to More Options and click on Advanced Options.
- Click on Optional Updates later the Advanced Options screen appears.
- Next, head to expand the Commuter Updates list and tick the checkbox for your graphics bill of fare driver.
- After checking the right box, click on the Download and Install button.
A more than reliable method would be to apply a third-party driver updating tool similar Auslogics Driver Updater. This is an intuitive program that scans your arrangement for driver-related issues, such as outdated or corrupted device drivers, and fixes them. Once Driver Updater has detected faulty drivers, all it takes to install the newest bachelor driver versions is 1 click of a push.
RECOMMENDED

Protect PC from Threats with Anti-Malware
Cheque your PC for malware your antivirus may miss and go threats safely removed with Auslogics Anti-Malware
DOWNLOAD NOW
You no longer have to invest time in looking up the commuter models and versions on your PC. What'southward more, you lot don't have to worry about incompatibility bug since but the correct drivers for your system are installed. The programme likewise lets y'all schedule automatic scans to ensure driver updates are installed equally soon as they are released. And, if the new drivers cause issues, you tin can easily revert to the previous versions.
Auslogics Commuter Updater supports Windows 10 and Windows 11, so you don't have to worry whether the tool will work on your system. It also downloads and installs drivers that are uniform with your operating system.
Once all the updates have been installed, restart your computer and bank check if the stuttering issue persists.
Solution 3: Close Background Applications
Your organisation cannot operate optimally when many background apps are running at the same time. So, if y'all take several applications running in the background, you might experience some stuttering and performance bug.
Additionally, other programs or the organization may lag due to all the resource beingness utilized by the background apps.
Try closing the background apps to see if this resolves the consequence. Hither is how to do that:
- Press the Ctrl + Shift + Esc shortcut to launch the Task Manager.
- Locate all the running background applications and processes and close them one by one by clicking on "End task".
Y'all tin can besides go through the Settings application to disable apps configured to run in the background when your PC starts.
Follow these steps for Windows 10:
- Printing Win + I to bring up the Settings app.
- Click on Privacy when Settings fully opens.
- Head to the left pane, roll down past App Permissions and click on Background Apps.
- At present, go to the principal screen and head to the list under "Select which apps to run in the background."
- Toggle off the switch beside the apps you lot want to disable and restart your computer.
- You should also disable some Startup apps that automatically start running when you log into Windows. Follow these steps:
- Get to the home page of Settings and click on Apps.
- After the Apps folio shows up, go to the left pane and click on Startup.
- Now, caput to the Startup Apps list and disable programs you want to foreclose from launching at startup.
Follow these steps for Windows 11:
- Press Win + I to bring up the Settings app.
- Click on Apps in the left pane of the window.
- Adjacent, click on Startup.
- At present, disable apps that you don't want to start automatically once you sign in.
- Restart your Windows 11 PC.
If the Windows PC keeps stuttering even with background applications disabled, endeavor the adjacent fix.
Solution iv: Disable the CD/DVD Drive
If your laptop has a CD/DVD bulldoze, try disabling and re-enabling it to run into if this works. Some users reported that this had stock-still their problem, and it may work for y'all as well. To do that, follow these steps:
- Launch the Device Manager via the Quick Access carte (Win + X). Alternatively, press the Win + R shortcut, blazon devmgmt.msc into the "Run" box, and hit the "Enter" key.
- Locate "CD/DVD ROM drives" and expand it. Right-click on the drive and select "Properties".
- Become to the "Commuter" tab and click the "Disable Device" button.
- Click on "Yes" and select "OK" to relieve your changes. This action disables the CD/DVD bulldoze.
- To re-enable it, repeat the steps above but select "Enable Device" this time.
- Click on "OK" to save your changes and cheque if this helps to fix the stuttering problem.
Solution 5: Uninstall the Problematic Software
This prepare is applicable if you started experiencing the error after installing a particular program. The software may not be compatible with your organisation. Or it might be glitchy, hence the reason it'southward consuming a lot of your organisation resources and causing the stuttering trouble.
To place the problematic application, launch the Chore Manager and check if the suspicious program is the one causing a spike in system resources. If information technology is, go ahead and uninstall it via the Programs and Features section in the "Settings" app or Control Panel.
Note, there are unlike ways to uninstall programs in Windows 10 and 11 using the Settings app.
Hither'due south how to remove apps from Windows 10:
- Launch the Settings application and click on Apps.
- Employ the search feature on the Apps & Features folio to look for the programme you want to uninstall.
- Subsequently it shows upward, click on information technology and select Uninstall.
- Click Uninstall again and follow the subsequent instructions.
Follow these steps to remove apps from Windows xi:
- Launch the Settings app and click on Apps on the left side of the window.
- Click on Apps & Features on the correct side of the adjacent screen and go to the App List section.
- You can use the search box to find the app yous want to remove.
- Once y'all go to the program click on the three dots to its (next to the plan's size) and select Uninstall.
- Click on Uninstall again in the confirmation box and follow the prompts to complete the process.
Solution vi: Bank check Your PC's Ability Management Settings
Your computer system has a characteristic that lets you customize your ability programme to control how information technology consumes power. If you've selected an wrong power plan, your organisation may not function optimally. Instead, it will start to lag.
Resetting the power plan to its default settings might resolve the error. Here'south how to exercise information technology:
- Press the Windows logo key and search for Control Panel.
- Select "Hardware and Audio", and click on "Power Options".
- Click on "Change program settings" next to your selected ability programme, and click the "Change avant-garde power settings" link.
- In the window that opens adjacent, click on the "Restore plan defaults" push button at the bottom of the folio. If you accept several customized plans, select each plan from the driblet-downwards list and click on "Restore programme defaults".
- Click "Yes" to confirm your choice.
Once done, restart your Windows PC and bank check if the issue has been resolved.
Solution 7: Scan Your System for Malware
A malware infection can corrupt system and application files and cause the stuttering result on your Windows PC. If the mistake persists, it's worth giving a malware scan a try. You can opt to apply a built-in Windows tool called Windows Security, or yous tin can install a more advanced malware removal tool like Auslogics Anti-Malware.
RECOMMENDED
Protect PC from Threats with Anti-Malware
Check your PC for malware your antivirus may miss and get threats safely removed with Auslogics Anti-Malware
DOWNLOAD NOW
You lot run across, the trouble with malware is that your ordinary antivirus program might not be able to detect all kinds of threats, specially those disguised equally genuine organization files or applications. That's why you demand powerful anti-malware software that's capable of detecting the malware hiding on your estimator.
If the tool finds any malicious items, it will quarantine them, assuasive you lot to safely delete them. If the scan comes back clean, and so the event lies elsewhere.
Solution 8: Scan Your System Files for Abuse
If the malware removal tool managed to find malware in your system, then there is a high take chances some of the arrangement files have been corrupted or damaged. In that case, running a System File Checker (SFC) scan volition help repair all the corrupted files.
To run an SFC scan, follow the instructions below:
- Press the Win + R keyboard shortcut, blazon CMD into the "Run" input field, and hit the "Enter" key.
- In the Command Prompt with ambassador rights, execute the command sfc /scannow. Requite the tool a few moments to check for problems and endeavor to fix them.
One time washed, reboot Windows and cheque if the PC is still stuttering.
Solution nine: Update Your Windows
As noted earlier, Windows updates are required to keep your system functioning properly. The updates usually innovate new features, security updates, and enhancements to your OS. Typically, Windows updates are automatically installed whenever they are available. Withal, yous tin manually check for updates and install them.
Hither is how to do that on Windows 10:
- Press the Win + I keyboard shortcut to bring up the "Settings" app.
- Into the "Notice a setting" input field, type "Updates" (without quotes) and select "Check for updates".
- In the adjacent window, check if any pending updates are waiting to be installed and install them. If there are none, click on the "Bank check for updates" button and expect for Windows to search for and install all available updates.
- You may be required to click on the Download & Install button for feature or quality updates.
- Later the updates are download, the client may also prompt yous to restart your calculator to complete the installation.
Follow these steps for Windows 11:
- Printing the Win + I keyboard shortcut to bring upward the "Settings" app.
- Click on Windows Update in the summit-correct corner of the Settings window or click on the Windows Update tab at the lesser of the left pane.
- Click on the Check for Updates button once y'all run across the Windows Update page.
- Y'all tin also click on the Download & Install button next to a cumulative quality or characteristic update.
- Restart your estimator to complete the installation.
Sometimes, updates themselves could be responsible for PC problems like random freezes and crashes. If that's the example, then uninstalling the problematic update should fix the trouble. For instance, one of the Windows 10 Apr updates caused PC games to randomly stutter. Users reported that the issue had stopped later on uninstalling the cumulative patch that was part of the update.
To uninstall a Windows cumulative update, follow these instructions:
- Printing the Windows logo key + I, blazon "Update history" (without quotes) into the "Observe a setting" text box, and select "View update history".
- Yous can run into a list of all the recently installed Windows updates. Click on the "Uninstall updates" link at the top of the page to open the "Installed updates" page in Control Console.
Note: In Windows xi, yous'll take to collapse the update history list and click on Uninstall Updates under Related Settings to open the "Installed updates" folio in Command Panel.
- Select the problematic update from the list and click on "Uninstall".
Solution 10: Keep Apps and Programs Updated
All your applications, including Windows apps and third-political party apps, should always be upward to date to keep working correctly. If the PC is stuttering every two seconds with audio and video bug when using a browser, update the browser to the latest version.
If this doesn't piece of work, try disabling all the browser extensions, add together-ons, and plugins to check if they are causing the issue. Alternatively, endeavour using another browser to see if the problem gets resolved.
Solution 11: Disable the Notification and Action Center
According to several users, disabling the notification surface area and Action Middle fixed the stuttering issue on their Windows PCs. To attempt this solution, follow these steps:
- Press the Win + R keyboard shortcut, type gpedit.msc into the "Run" text box, and hit the "Enter" key.
- In the Group Policy Editor window, navigate to this path: User Configuration > Authoritative Templates > Start Bill of fare and Taskbar.
- In the correct sidebar, locate the "Remove Notifications and Action Heart" policy and double-click it.
- On the adjacent screen, click on the "Enabled" radio button. This removes the Notifications and Action Center, and you won't exist able to review any notifications that yous've missed.
- Click on Apply > OK and restart your system for the changes to have outcome.
Solution 12: Disable Your Organisation's Loftier Precision Outcome Timer Device
The High Precision Event Timer, HPET for short, is a Windows device used to synchronize multimedia streams to reduce the need for unnecessary timestamp calculations. The device is designed to smooth your system's playback.
It's true thatthe tool tin can increase PC performance and facilitate an impressive playback experience. That said, it can cause latency problems and FPS losses when you beginning playing games. Disabling it tin remove the stuttering issues you lot feel when gaming.
Follow these steps:
- Launch the Device Managing director via the Quick Access menu (Win + Ten). Alternatively, press the Win + R shortcut, type msc into the "Run" box, and hit the "Enter" primal.
- Once the Device manager appears, go to the System Devices category and expand it.
- Next, locate and right-click on the "Loftier precision event timer."
- Select Disable Device from the context menu.
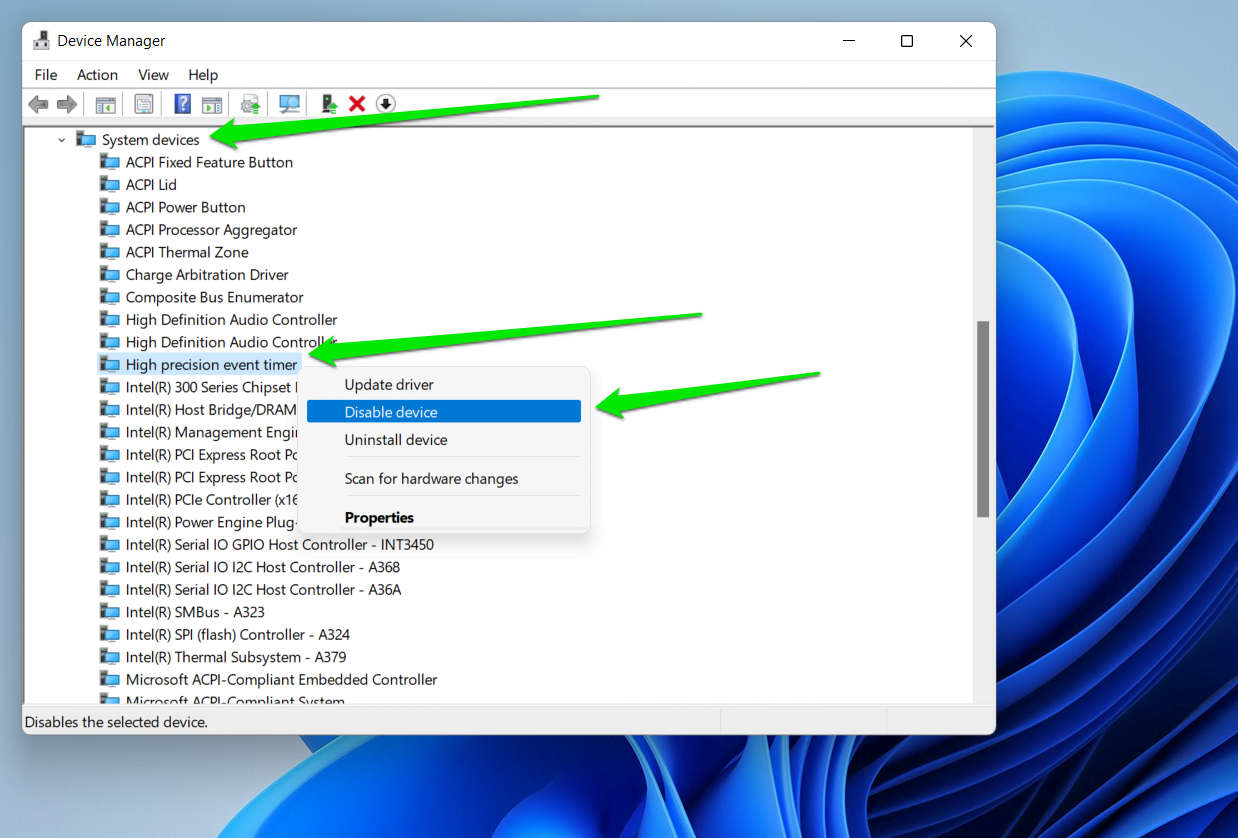
- Click Yeah in the confirmation pop-up.
We promise you lot find this information on how to ready the "Windows 10 is stuttering every few seconds" result helpful. And then, you no longer have to ask, "Why does Windows 11 lag every few seconds?"
If y'all have additional information regarding how to fix stuttering on Windows 11, delight utilise the comments section beneath.

How To Fix Sound Lag On Computer,
Source: https://www.auslogics.com/en/articles/windows-10-pc-is-stuttering-every-few-seconds/
Posted by: brownfrophe.blogspot.com
0 Response to "How To Fix Sound Lag On Computer"
Post a Comment